PROCESS VERSUS PRODUCT
There is a debate in the art education field about teaching “process” versus “product”. I teach mostly product art. Students have minimal amount of choices to make in the art. As the student gets older there are more choices available to them. Product art usually comes out great. It is easy to link it to an engaging lesson integrating social studies, math, science or language arts. Product art helps most students feel successful. They are also learning basic skills to create art.
Process art is letting students choose how to express themselves through art. Ideally there would are centers with different materials and possibly a theme. I have been very nervous to try this in elementary school because I want students to feel proud of their finished product. Process art has less direction so the outcome does not always match to the amount of learning.
I use process art for the preschool. I have them experiment with the materials and create their own original art. It is easy to implement process art for for preschool because at this age art should be about exploration of materials.
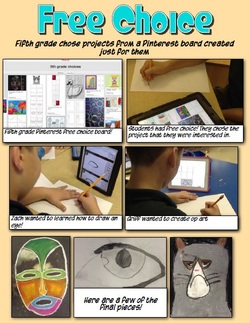
After a lot of thought, I have decided that I do not need to be a product only teacher or a process only teacher. I could combine the ideas. I created a Pinterest page for fifth grade of project choices. Most of the choices link back to a “how to draw” webpage. I chose to do the step by step page because some fifth graders still need help decoding art.
It was successful for many reasons:
1. Students enjoyed choosing their own projects and being in control of their pace.
2. One students who is usually an average art student excelled.
3. Another student who gives up easily know had to be responsible for their own work.
It was unsuccessful for many reasons:
1. Some students picked a project, tried it and gave up and moved to a different project. I will need to explain that drawing takes practice and it may take a few times to come out the way you expect it to.
2. Lower performing students didn’t have me as a crutch to guide them because it took more time to go around the room.
3. A lot of the art was not up to my high standards.
In the end, I will do it again and try to get over the fact that there is no good or bad art.
I am hoping more independence in the art room equals more quality art.
Below is a blog post about the project from one of my students
Process art is letting students choose how to express themselves through art. Ideally there would are centers with different materials and possibly a theme. I have been very nervous to try this in elementary school because I want students to feel proud of their finished product. Process art has less direction so the outcome does not always match to the amount of learning.
I use process art for the preschool. I have them experiment with the materials and create their own original art. It is easy to implement process art for for preschool because at this age art should be about exploration of materials.
After a lot of thought, I have decided that I do not need to be a product only teacher or a process only teacher. I could combine the ideas. I created a Pinterest page for fifth grade of project choices. Most of the choices link back to a “how to draw” webpage. I chose to do the step by step page because some fifth graders still need help decoding art.
It was successful for many reasons:
1. Students enjoyed choosing their own projects and being in control of their pace.
2. One students who is usually an average art student excelled.
3. Another student who gives up easily know had to be responsible for their own work.
It was unsuccessful for many reasons:
1. Some students picked a project, tried it and gave up and moved to a different project. I will need to explain that drawing takes practice and it may take a few times to come out the way you expect it to.
2. Lower performing students didn’t have me as a crutch to guide them because it took more time to go around the room.
3. A lot of the art was not up to my high standards.
In the end, I will do it again and try to get over the fact that there is no good or bad art.
I am hoping more independence in the art room equals more quality art.
Below is a blog post about the project from one of my students

This blog post is from one of my students http://mjgds.org/students/elianaj/2013/12/10/pinterest-art-class/
ART AS A MESSAGE: Social Studies & Language Arts
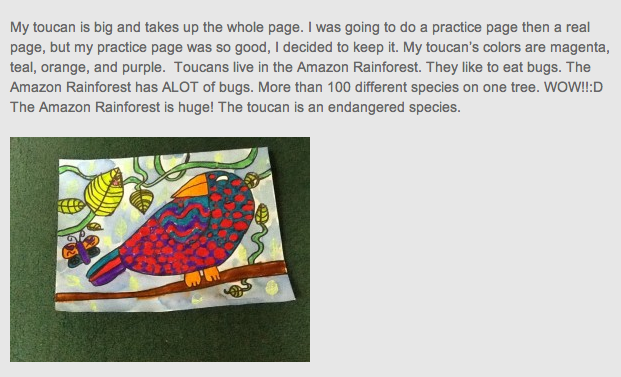
Concept: Students will make a toucan while learning about the rainforest. They will discuss how art can send a message.
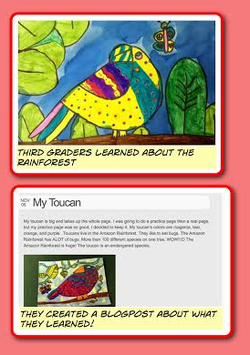
Social Studies: Third graders learned about different types of animals and insects that live in the rainforest. The rainforest is being cut down because of man. Destroying the rainforest causes the possible extinction of certain animals.
Third graders also learned about toucans. Toucans live in the rainforest. Eagles, hawks and jaguars are predators of toucans. They eat fruits and nuts and occasionally lizards.
Language Arts: Students discussed how they can make people aware of the destruction of the rainforest. We decided that art can send a message by creating posters or adding it to their student blogs. Their language arts teacher collaborated with me and had the third graders write a blog post about what they learned. Here is a link to Saylor's blog.
Assessment: The blog post was great way to assess what they learned. I could see who understood why we were doing the lesson.
How to draw a toucan is from
Dynamic Art Projects for Children
What is Art?
"Everything has its beauty but not everyone sees it"- Confucius
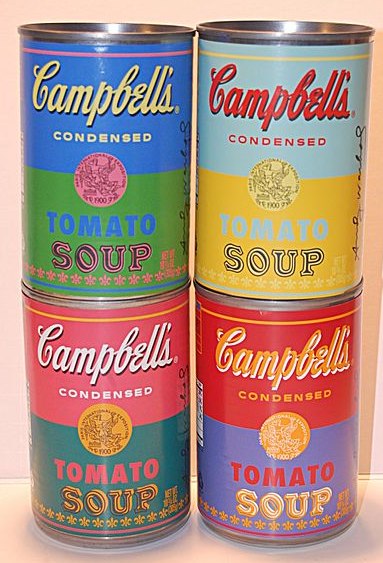
First graders discussed "What is Art?" while looking at paintings and sculptures by Andy Warhol. We compared a Cambell's soup can from the grocery store and the painting of a soup can by Andy Warhol in addition to his sculpture of Brillo Boxes and Brillo Boxes from the store. They even watched a video of Andy Warhol eating a hamburger that is considered an art film.
First graders discussed "What is Art?" while looking at paintings and sculptures by Andy Warhol. We compared a Cambell's soup can from the grocery store and the painting of a soup can by Andy Warhol in addition to his sculpture of Brillo Boxes and Brillo Boxes from the store. They even watched a video of Andy Warhol eating a hamburger that is considered an art film.
By Thomas Altfather Good (Original Work) [GFDL (http://www.gnu.org/copyleft/fdl.html) or CC-BY-SA-3.0-2.5-2.0-1.0 (http://creativecommons.org/licenses/by-sa/3.0)], via Wikimedia Commons
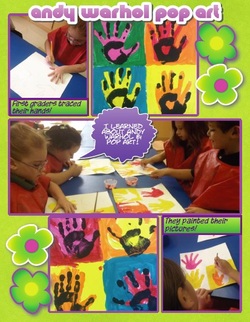
This was such a simple, easy and successful project!
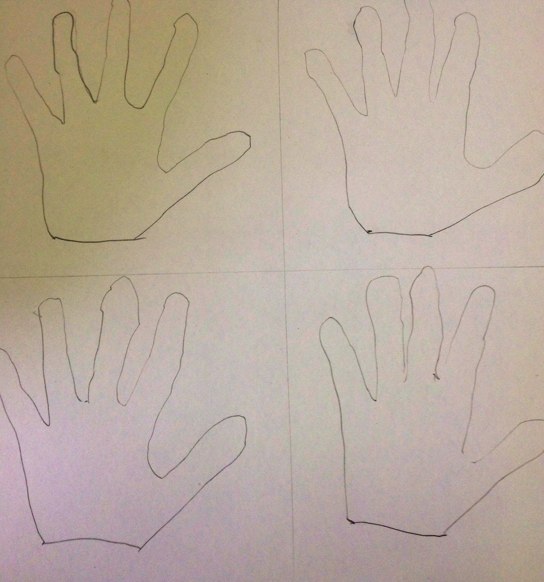
Day 1:
1. Divide the paper into four sections.
2. Students trace their hand in each section.
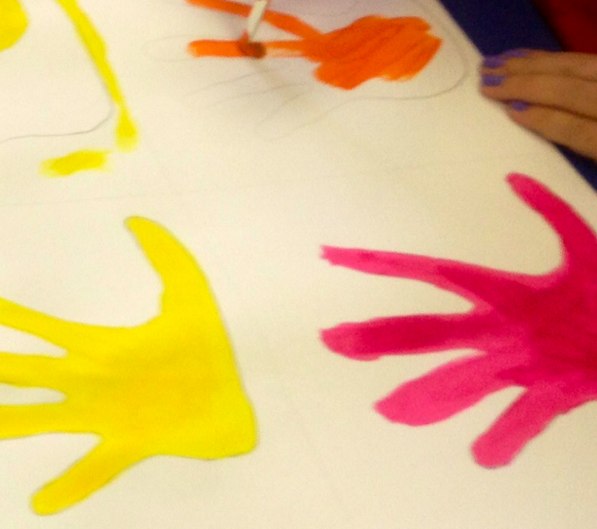
SET UP: There are 4 tables and each table has a one paint color on it.
3. Each student goes from table to table painting their handprint until each of the four traced handprints are different colors.
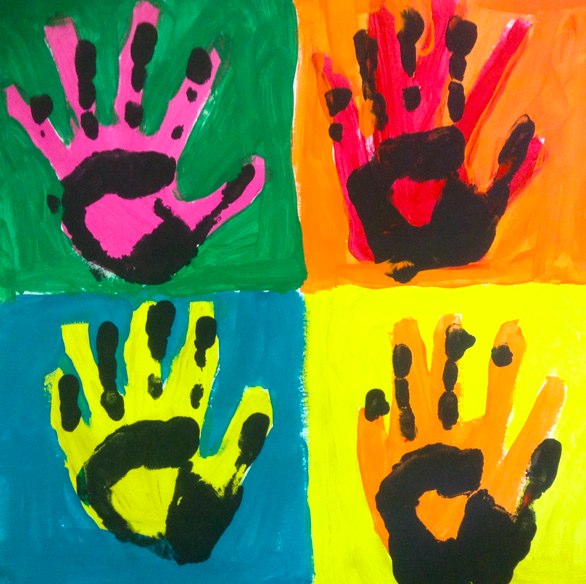
Day 2:
4. Students go to each table and paint each of the four backgrounds a different color. Note: Explain that the hand and background must be a different color in each square.
5. Put black paint on tray and have students press their hands in it and press down on the colored handprint.
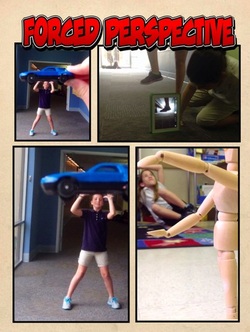
FORCED PERSPECTIVE: Language Arts & Technology
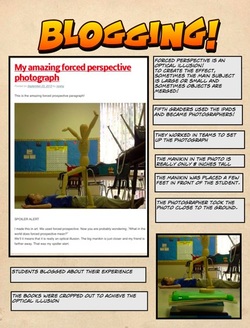
Fifth graders became photographers using their iPads!
Concept: Students will learn about forced photography. Forced perspective is an optical illusion. They were shown examples and given the following choices to use for their photographs:
Main object can be small or large
Subjects can be merged
Subjects can "bend gravity"
Most chose to make the subject big or small, as shown by the picture on the left. The manikin is really only a few inches tall but appears taller because it is closest to the camera.
Technology: Students learned how to create optical illusion with the camera app on the iPad. They also learned to edit their photos. They already had experience uploading their photos into the student blogs.
Language Arts: Fifth graders used the iPad to write on their blog about their experience as photographers.
Language Arts: Fifth graders used the iPad to write on their blog about their experience as photographers.
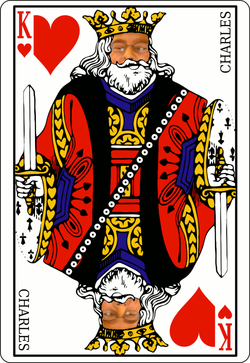
ROYAL SELF PORTRAITS: Art, Social Studies, Language Art & Technology
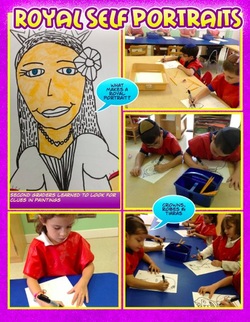
Second graders learned about royal portraits and created a royal self-portrait.
Concept: Students will decode art.
What clues are in royal portraits that help you know they are royalty?
Scepter, crown, tiara, robe and crown are some of the clues in a royal portrait.
Social Studies:
I found a great lesson on King Edward VI at http://creativity.denverartmuseum.org/?lesson-plan=royal-portraits. I used a lot of information from this lesson and added paintings of animals dressed as royalty to keep the second graders engaged. They giggled each time they saw a dog with a crown and robe but they learned a lot about decoding art and King Edward VI.
Students created themselves as a king, queen, princess, prince or knight. All the boys and 1 girl chose the knight. Some created a castle in the background.
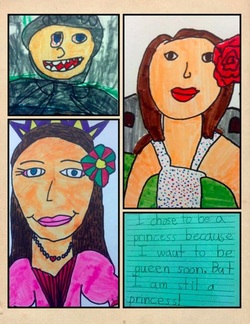
Language Arts:
The second grader's wrote, in language arts, why they chose to be a king, queen, princess, prince or knight. Their stories were hung in hall next to their portraits.
This is what a few of the students wrote
"I chose to be a knight because they protect the kingdom. Another reason I chose to be a knight is they have a funny feather."
"I chose to be a queen because I will get a pretty crown"
"I chose to be a princess because I want to be a queen soon. But I am still a princess!"
They are also creating maps of castles in their language arts class.
Technology:
Second graders went to www.festisite.com/cardgame/ and turned themselves into a king or queen to add to the royal fun!
We tried to use the iPad for this project but it kept turning our photos upside down. We then used the laptop. It was pretty simple. Just take a photo, upload it, size it and download!
ERASER RENTAL
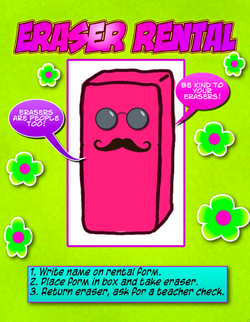
Tip: The erasers in the art room go through a lot! They are stabbed, colored, ripped and shredded. I had to find a way to salvage the few erasers I had left!
I wish I could give this person credit but I can't remember where I found this idea. I think it may have been from the classroom management class I took from the Art of Education.
Eraser rental! All the erasers are in a box with the rental sign attached to it. Students have to sign out the eraser if they want one. They must write their name on a paper and include the condition of the eraser they are checking out. The conditions choices are "Happy", "okay" or "sad" condition.
This has made everyone more accountable and the erasers have not been destroyed since I started this!
THIRD GRADE
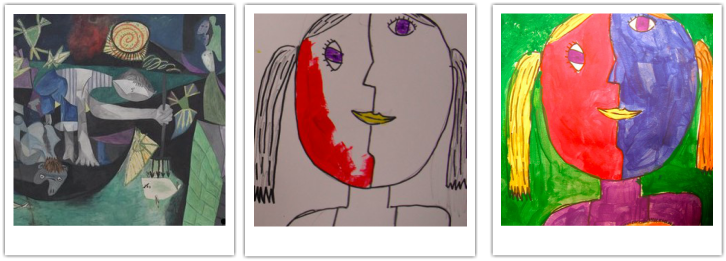
PABLO PICASSO
PORTRAITS
Third graders learned about Pablo Picasso and created cubist self-portraits using digital tools as well as paint.
The lesson started with a great interactive website, www.picassohead.com/.
Students used this website to design a collaborative abstract Picasso face on the Smart Board. One by one they came up to the Smart Board to choose eyes, nose, hair, face, ears, mouth and more until the fabulous face was complete! I offered and incentive for the third graders to use the website at home...... I would post their portrait in the school art blog. This is a sample of one of the pictures that was e-mailed to me.
The third graders used oil pastels and watercolors to create their cubist portraits.
There are lots of great website to help enhance you Picasso lesson
MOMA- Museum of Modern Art has great videos for grades K-6. I show them the paintings from Picasso before the video and we discuss what the paintings is about. There are two videos to choose from
Kids: Pablo Picasso. Guitar. Paris, after March 1914
Pablo Picasso. Guitar. Paris, after March 1914- This video discusses sculptures
Pablo Picasso. Three Musicians. 1921
Pablo Picasso. Night Fishing at Antibes. Antibes,
August 1939
Oil on canvas, 6' 9" x 11' 4" (205.8 x 345.4 cm).
Mrs. Simon Guggenheim Fund.
© 2006 Estate of Pablo Picasso / Artists Rights
Society (ARS), New York
